
Manual / Getting Started
Quick Start
This chapter takes a Raspberry Pi from a blank SD card to a calibrated camera sending PSN to your console. Allow about 30 minutes on the bench, plus the time to mount the camera and tape a rectangle on stage. The terms used here are explained in Core Concepts.
No camera or stage yet? Try It Out runs OpenFollow with a sample stage picture in about ten minutes. Already installed and just want to calibrate? Skip to Camera Calibration.
Before you start
Have these on hand:
- Raspberry Pi 5 (or Compute Module 5 + IO board) and a power supply
- A microSD card (or, for CM5, the eMMC + an IO board for flashing)
- An IP camera or other supported video source on the same LAN
- A USB-wired gamepad (optional but recommended – wired only)
- A Mac or PC where you can run Raspberry Pi Imager
1. Flash the OpenFollow image
Both the Raspberry Pi 5 and the Compute Module 5 run a ready-made OpenFollow image – a Debian-based system with OpenFollow pre-installed. It boots straight into the app on HDMI, so there’s no OS to install and nothing to set up on the device itself.
Download the image for your board from the Download section of this website, then flash it with Raspberry Pi Imager: Use custom, select the .img.xz file, Choose Storage, then Write.
- Raspberry Pi 5 –
openfollow-pi5_<version>.img.xz, written to a microSD card. - Compute Module 5 –
openfollow-cm5_<version>.img.xz, written to the eMMC. Put the CM5 IO board intorpiboot/usbboot mode first so the eMMC appears as a USB drive – see Installation → Compute Module 5 for the steps.
Insert the card (or reboot the CM5) and power up. The Pi comes up running OpenFollow full-screen on HDMI.
Once it boots, the Operator Screen lists the Pi’s IP Address and its Web address (<hostname>.local). Use the IP address wherever this manual writes <pi-ip>.
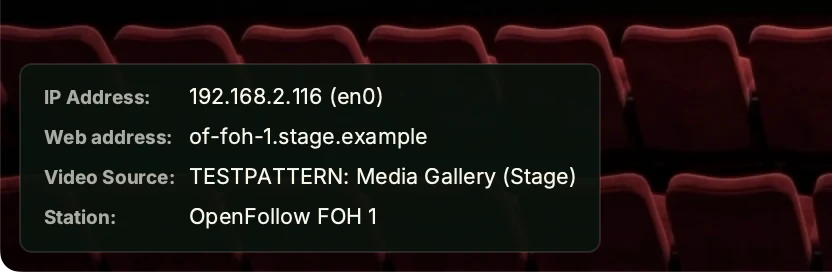
You won’t need a command line to set OpenFollow up – everything is in the web UI. If you later want one for diagnostics, SSH into the Pi with ssh openfollow@<pi-ip> using the username openfollow and the password openfollow.
2. Open the Web UI
From any device on the same network, browse to:
http://<pi-ip>You should land on the Overview tab.
If the page doesn’t open:
- Use the IP address, not the
.localname; not every network resolves it. - Check that your computer and the Pi are on the same subnet.
- On a network without DHCP, set an address on the Pi: press M on a keyboard (gamepad: BACK) for the Settings menu, then Network Interfaces.
3. Position the camera
Get the camera physically mounted first. The wizard solves the camera’s position and angles from four corners you mark on stage, so no angles are entered.
OpenFollow-specific constraints:
- Look down at the stage. A higher, steeper view gives the best depth accuracy.
- All four grid corners must fit inside the image, with a little headroom. Clipping a corner at the edge drops accuracy fast.
- Frame the performers, not just the grid. The grid is a calibration target – performers can move outside it. Centre the area you actually want to track in frame.
- Disable auto-focus and auto-zoom. Both change the effective field of view and break the calibration.
Typical position
A common starting point for a mid-sized stage: camera at the FOH balcony rail, ~6 m up and ~10 m back from the downstage edge. Adjust to what your venue actually allows.
Try your numbers in the interactive Positioning the Camera sketch first – it shows where the field of view lands on the grid before you mount anything.
Measure relative to the Reference Point
Tape a rectangle on stage and measure its width and depth. Decide where the point of origin (the Reference Point) sits – by default, in the middle between DSL and DSR. A rough camera position is optional; the wizard only uses it to check the result.
For the full theory and edge cases see Camera Calibration.
4. Run the Setup Wizard
Open the Camera & Grid tab and click Open Setup Wizard. The wizard has four steps; use Simple mode in Camera Calibration:
- Video Source. Pick the input. For bench testing without a real camera, choose Media Gallery. For the full per-protocol setup (RTSP, NDI® 1 2, Pi Camera, USB), see Video Inputs. Click Save & Next.
- Lens. Draw lines that are straight on stage to measure lens distortion. A camera without visible barrel distortion needs no lens measurement.
- Camera Calibration. In Simple mode: say where the camera is, enter the rectangle’s width and depth, choose the point of origin, then drag the four corners onto the tape marks. Use the 4× loupe that appears while dragging.
- Review. Check the solved camera values, then click Save and finish. Leave without saving keeps the previous camera, lens and grid.
The full step-by-step is in Setup Wizard.
5. Verify PSN output
The station sends the markers it controls as PSN on 236.10.10.10; marker 1 is controlled from the first boot. Output → PSN Output shows the multicast group and the PSN System Name, which is the Station name from General → Station Settings (e.g. OpenFollow brave-otter).
Plug in a gamepad or use the keyboard (see Controls) and move marker 1. On a console in the same subnet that accepts PSN – for example grandMA3, Hog 5 or ChamSys MagicQ – the position updates at about 60 Hz.
Without a console, run PSNView by OpenFollow (macOS, Windows and Linux) on a Mac or PC in the same subnet. It shows every marker the station sends, with its position, as PSN arrives.
To aim fixtures at the marker, continue with the guide for your console: grandMA3, grandMA2, ChamSys MagicQ or ETC Eos. Eos takes positions over OSC, not PSN.
6. Before the show
A new station has no web access PIN, so anyone on the network can change its settings. Set one under General → Station Settings → Web access PIN before you connect it to a show network.
Common problems
- Web UI doesn’t open. See step 2 and Web UI is unreachable.
- Black or missing video. The Operator Screen names the cause in its status rows. See No video / black image.
- Gamepad does nothing. Use a USB-wired pad in XInput mode. See Gamepad not detected.
- Console sees no PSN. Usually the network: the console must be in the same subnet, and a managed switch needs IGMP snooping with a querier. See PSN not received by the console.
- Markers drift after a few minutes. The camera was bumped or the lens auto-focused. Recalibrate.
- Web UI is slow. The Pi is probably running detection without a GPU. Switch off Person detection Experimental under General → Station Settings → Advanced Settings → Features and try again.
1. NDI® is a registered trademark of Vizrt NDI AB.
2. OpenFollow does not contain any NDI® code by itself. NDI® requires closed source NDI® Tools / NDI® SDK on the host system that need to be installed separately.