
Manual / Tracking
Gamepad, Keyboard & OSC
Five input methods drive markers: gamepad, keyboard, mouse, 3D mouse, and OSC. A sixth, Touch Remote, is an experimental setup tool. The keyboard is a full live input, not a fallback.
All five can be active at once. Within a frame, last-write-wins per axis.
For controls that drive OSC messages rather than markers – MIDI controllers and virtual faders – see Hardware Inputs. Both chapters work together: this one is about marker movement; that one is about message generation.
Controller Slots
Input → Controller Slots lists which controller holds which slot (C1, C2, …) and which marker each slot drives. Gamepads and 3D mice share one numbering. The table refreshes every second.
Slots follow the USB socket each controller is plugged into, so the same cables give the same order after a restart. Slot C1 drives the first entry of the station's controlled markers, C2 the second. With exactly one slot, that controller drives whichever marker is selected, and the marker-cycle buttons switch it. A pinned slot belongs to whatever is plugged into its socket.
| Column | Shows |
|---|---|
| Controller | The device name; two identical pads show the same name and the port tells them apart. The dot after the name lights as the controller is used. Notes below the name: Buttons not recognised (no layout known and no Button Detection Map saved), Button map is for another model (re-run the wizard), Can't identify (no vibration or light, so Identify only flashes the marker card). |
| Connection | The kind (Gamepad or 3D Mouse), the slot state, and the socket (such as on USB 2, port 1, on Bluetooth, or no stable port), or Pinned to … for a pinned slot. |
| Marker | The marker the slot drives, by name and ID. A blue P means the marker is parked. On a connected or missing slot it is a picker of the station's controlled markers; a lone controller shows All markers. |
Slot states:
- Connected – plugged in and driving the slot's marker.
- Missing – unplugged, dropped out, or its kind switched off. Slot and marker stay put, so nobody else changes marker. The marker card turns red on the Operator Screen, and the status indicator and Status & Diagnostics name it.
- Reserved – a missing slot that was forgotten. It keeps its place in the numbering but drives no marker and raises no warning.
- Empty – a free slot below a pinned one; the next controller plugged in takes it.
Identify (connected slot) pulses the controller – a pad vibrates, a 3D mouse blinks its light – and flashes its marker card on the Operator Screen. Forget (missing slot) makes it reserved; reserved slots still count, so the other controllers keep their markers.
Pin here waits up to 10 seconds for a button press and pins that controller's socket to this slot, swapping it with the slot's controller. No marker moves while it waits; Cancel or Esc stops it. A controller with no stable port (as on macOS) can't be pinned. Unpin drops the pin; slots renumber by socket at the next restart.
Picking a marker another slot drives swaps the two; if this slot had none, the other is left without one. Pins and picks stay on this station: export and sending settings leave them out.
A controller plugged into a pinned socket takes that slot. One plugged back into its own socket takes its own slot again. A different controller of the same kind takes the lowest missing or reserved slot; anything else joins at the end. A restart numbers everything by socket again.
Control frame
Control frame (Markers & Zones → Marker Movement) sets which way the gamepad, keyboard, and 3D mouse move a marker:
- Stage axes (default) – stick up moves upstage, stick right moves stage left, whatever the camera sees.
- Fixed heading – stage axes turned to the bearing in Heading (°), measured like the camera's Yaw:
0looks upstage,180looks back at the audience,90/270look across the stage. Set by hand; needs no calibration. - Camera heading – stick up moves away from the camera, stick right to its right, along the floor. Follows the calibrated camera, including a recalibration.
- Screen – stick up moves the marker up the picture, at its current height. Where the picture gives no answer (marker off the picture, behind the camera, at the horizon, or higher than the camera), that move uses Camera heading.
Each controller keeps the direction it started with until its stick returns to centre. Only the direction changes; speed and height are unaffected. Mouse control and OSC position messages are not affected either.
Keyboard
Keyboard input uses direct hardware polling, so it stays responsive under heavy pipeline load. Configure in Input → Keyboard; Move markers with the keyboard turns the movement keys on and off (the action keys keep working).
Movement layouts
Pick the X-Y movement layout that suits your operator. The arrow keys are reserved for navigating the on-display menu, so they’re not available for marker movement.
| Layout | Forward | Back | Left | Right |
|---|---|---|---|---|
| WASD (default) | W | S | A | D |
| IJKL | I | K | J | L |
| Numpad | 8 | 2 | 4 | 6 |
“Forward” is upstage (+Y), “back” is downstage (−Y).
Keyboard Layout
Keyboard Layout sets the layout of the keyboard plugged into the station, so a key reads as the letter printed on it – a QWERTZ operator pressing the physical Z gets Z. System uses the layout set in the station's operating system; Variant picks a variant of the chosen layout (Standard is the layout as it is).
A new layout takes effect after a restart: the section names the layout still in use and offers Restart OpenFollow, and outputs pause until the app is back. The layout belongs to the station – it is not exported or pushed to other stations, and Restore defaults returns it to System. The setting appears only on a station that runs OpenFollow's own Operator Screen.
Default action keys
All of these are configurable under Button Mapping:
| Action | Default key |
|---|---|
| Z+ (raise marker) | Q |
| Z− (lower marker) | E |
| Reset Marker | X |
| Toggle Help overlay | H |
| Toggle Zone overlay | Z |
| Speed − | R |
| Speed + | T |
| Settings Menu | M |
| Next Marker | Tab |
| Prev Marker | (unset) |
| Clear Messages | (unset) |
The WASD and IJKL keys are reserved for movement, so no action can use them.
One input per action
Each key or button drives one action. Assigning one that another action already uses moves it: the field you changed says in blue where the input came from, and the field it left empties and turns red – that action does nothing until it gets an input again. The same applies to gamepad buttons and 3D mouse button indexes.
Hotkey-driven OSC
Beyond marker movement, any keyboard combination can fire an OSC message via an OSC transmitter with a Hotkey trigger. See OSC Transmitters → Hotkey – useful for cue triggers, scene jumps, or operator macros without leaving the keyboard.
Gamepad
Standard USB-wired gamepads are auto-detected. Configure in Input → Gamepad. The reference layout is Xbox-style1; the form lets you remap any button when the labels don’t match (e.g. Switch Pro, third-party Xbox-likes).
The controller must be in XInput mode. Pads with a mode switch default to XInput, DirectInput, or a console profile depending on the model – check the controller's manual for how to select XInput.
Multiple gamepads can be connected to one station, one per operator. Each pad takes a controller slot (C1, C2, …) that follows the USB socket it is plugged into; slot C1 drives the first marker in the station's controlled-marker list, C2 the second, and so on. With two or more controllers connected, Next Marker / Prev Marker are suppressed (each operator's pad stays on its marker), and Left Bumper / Right Bumper on a pad adjusts the speed of its marker only. A controller with no marker route appears under Unbound controllers in the on-screen Settings info card; its Left Bumper / Right Bumper do nothing.
Use a wired gamepad for show work. See Hardware → Gamepads.
Sticks
- Move stick (default: right stick) – X/Y motion. The deadzone and response curve below apply to whichever stick you pick.
- Axis Deadzone (0–1) – fraction of stick travel treated as zero. Default
0.05; raise it if the marker creeps when the stick is released, lower it for tighter response on a well-centred stick. - Response Curve – how deflection maps to velocity: Linear (proportional), Logarithmic (default – fine control near centre, faster toward the edges; usually best for followspot work), Quadratic (a steeper ramp than Logarithmic), or S-Law (slow at both ends, fast through the middle).
- Stick Y axis – Push up to move up the screen (default) or Push up to move down the screen (flight-sim style).
Stick deflection translates to velocity in m/s, scaled by the current speed (modified by the Speed −/+ buttons).
Default button mapping
The default mapping; the names follow Button Names.
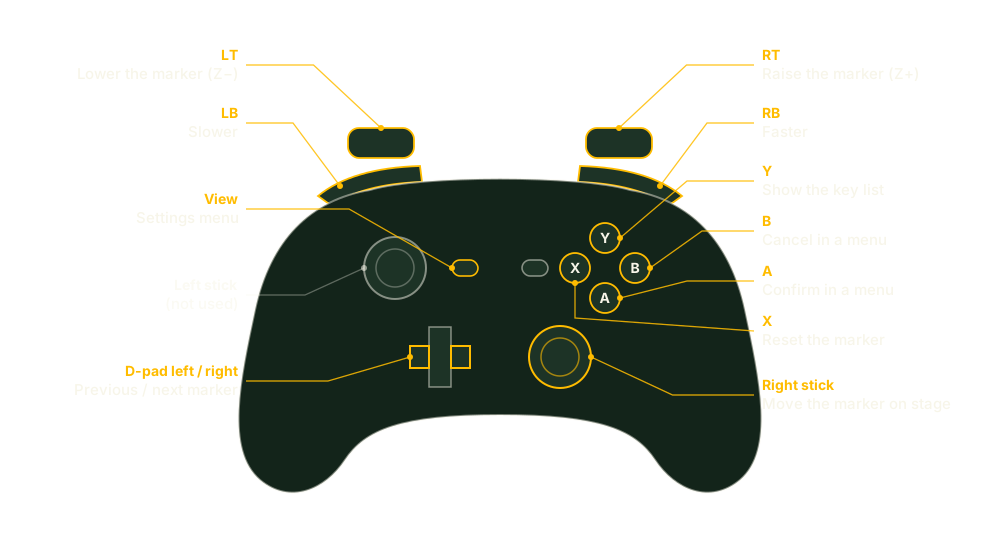
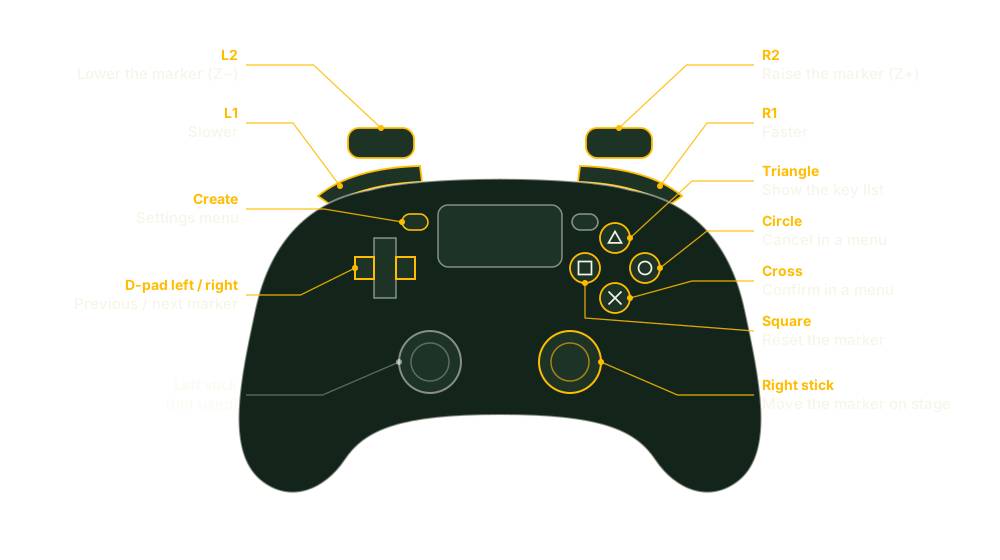
| Button | Action |
|---|---|
| Right Stick | Move X/Y |
| X | Reset Marker |
| Y | Toggle Help |
| Back | Settings Menu (in any menu, closes them all) |
| Left Bumper / Right Bumper | Speed − / Speed + |
| Left Trigger / Right Trigger | Move Z− / Move Z+ |
| D-Pad Right / D-Pad Left | Next Marker / Prev Marker |
| A / B | Menu Confirm / Menu Cancel |
Clear Messages and Toggle Zone Overlay are unbound. – leaves an action unbound; Reset to Defaults restores all assignments. The menu navigation buttons are read only while a menu is open, so they may share a button with a normal-mode action. Move X/Y and the marker fader stick cannot share a stick; that holds Save.
Buttons can also be bound as triggers for OSC outputs (see OSC Transmitters → Controller button) – fire a cue from the gamepad without the operator letting go of the sticks.
Button Names
Button Names picks the pad family whose button names the station shows. Only the names change; every binding stays on its physical button.
| Standard | Xbox | PlayStation2 | Nintendo |
|---|---|---|---|
| A / B / X / Y | A / B / X / Y | Cross / Circle / Square / Triangle | A / B / X / Y |
| Left Bumper / Right Bumper | LB / RB | L1 / R1 | L / R |
| Left Trigger / Right Trigger | LT / RT | L2 / R2 | ZL / ZR |
| Back | View | Create | Minus (-) |
| Start | Menu | Options | Plus (+) |
Marker fader stick
Marker fader stick (– (unused), Left Stick Y, Right Stick Y) picks the stick Y axis that drives the marker's fader value; it cannot be the Move X/Y stick. Marker fader speed (s) (0.05–60, default 1.0) is the time for a full sweep at full deflection.
Speed ramp
The Speed − / Speed + controls (Left Bumper / Right Bumper on a gamepad, R / T on the keyboard) step the active marker's tracking speed through the configured Min–Max range. Tapping repeatedly accelerates the step: a streak of presses ramps the increment up through 1×, 3×, then 8×, so a burst crosses the range fast while a single tap nudges finely. Each controller's ramp is independent – on a multi-operator station, one pad accelerating its marker doesn't carry into another pad.
Button detection wizard
When a pad's physical layout doesn't match the Xbox reference, auto-detect it instead of remapping by hand: Input → Gamepad → Button Detection Map → Start Button Detection Wizard. The wizard runs on the app display as a full-screen overlay – press each button as prompted (Step X of Y) and OpenFollow learns the raw index behind every label. Results fill the detection map and the controller name shows as Mapped with ….
The wizard takes exclusive input on the app display while running. Cancel it with Esc on the device, or Cancel wizard in the web UI – the web cancel exists so a keyboardless operator isn't stranded once the wizard has grabbed input.
The wizard stores the captured pad's GUID alongside the name. If a later session connects a pad whose GUID doesn't match – a different physical unit, or the same pad in a different mode (most often: not in XInput) – the journal logs a one-shot warning per GUID and the Gamepad controllers (E9) section of the diagnostics bundle reports calibration MISMATCH. Re-run the wizard on the actual unit to clear it.
Mouse
Off by default; enable it with Steer markers with the mouse under Input → Mouse. Left-click a marker's ground circle to take control – the marker is grabbed where it stands, not moved to the cursor – then move the pointer to steer it. A click on empty stage does nothing; left-click another marker's circle to switch. Right-click releases the marker. Useful for static positioning during programming, and as a quick stand-in when no gamepad is to hand.
One mouse per station: all mice share a single system cursor, so only one marker is steered at a time. For several markers at once, use one gamepad per operator.
- Double right-click: Reset and release the marker – when on (default), a double right-click snaps the marker to its default position and lets go of it.
- Hysteresis (px) – a deadband on the cursor, in screen pixels, against hand tremor.
0applies every movement. - Smoothing (0–1) –
0is direct 1:1 control; higher values glide the marker toward the cursor. - Maximum Y+ (m) – the farthest upstage a mouse target may go. Near the top of the picture a tiny cursor move maps to a huge upstage distance; a move past the limit is ignored.
0means no limit. - Scroll wheel – raises and lowers the controlled marker's height. Wheel direction sets whether scrolling up raises (default) or lowers it; Step per tick (m) is the height change per wheel click, default
0.1. A trackpad or Magic Mouse sends many scroll events per swipe and moves the height much further.
3D mouse
A 3Dconnexion SpaceMouse or SpaceNavigator3 is a spring-centred six-axis (6DOF) puck you push, pull, lift, and twist to steer a marker. Off by default; turn it on with Steer markers with a 3D Mouse under Input → 3D Mouse. Changes apply live, with no restart. Plug it in and it's picked up automatically; with none connected the section still saves but nothing moves.
A 3D mouse counts as a controller in its own right, sharing one numbering with gamepads, ordered by USB socket (see Controller Slots). Its marker carries a controller indicator (C1, C2, …) on the Operator Screen. On its own it drives the currently selected marker, like the keyboard and mouse – use its marker-cycle buttons to change which. Alongside other controllers it is pinned to its own marker, the way two gamepads each keep their own, so operators don't fight over one selection; the marker-cycle buttons go quiet in that mode.
A status box at the top of the section appears only when something keeps a 3D mouse from working (support not installed, unsupported model, no permission to open the device, device could not be opened) and says what to do. A working puck is listed under Controller Slots.
Axis mapping
Each of the six motions maps on its own to a target. Defaults:
| Motion | Target |
|---|---|
| Push left / right | Move X |
| Push forward / back | Move Y |
| Pull up / push down | Move Z (height) |
| Twist / spin | Speed |
| Tilt forward / back | Off |
| Tilt left / right | Off |
Re-point any motion at any Target: X / Y / Z (move the marker along that stage axis), Speed (ramp the marker's move-speed while held), Fader (drive the controlled marker's fader 0–1 while held), or None. To follow the camera's view, use Control frame rather than inverting axes. Each axis also carries its own:
- Sensitivity (0–10) – a multiplier on that axis.
1moves at the marker's configured speed;2doubles it; below1is finer. Set height gentler than lateral movement, for instance. - Deadzone (0–1) – a dead band near centre, so the marker doesn't creep when your hand rests on the puck. Raise it on a twitchy axis.
- Direction – Normal or Inverted.
A shared Response curve shapes deflection-to-speed for all axes: Linear, Logarithmic (fine near centre, fast at the edges), Quadratic (finer still near centre), or S-Law (eased at both ends).
Buttons
Bind device buttons to Reset marker, Next / Previous marker (when the 3D mouse is the only controller), Speed up / Speed down, Toggle help, and Toggle zones. Click Detect next to a binding and press the button on the device to fill it in; leave a binding blank to unbind it; an index another action uses moves over (see One input per action). Button counts vary by model. The Settings menu has no 3D-mouse binding – opening and navigating it needs a keyboard or gamepad.
OSC input
OSC input lets external systems drive markers directly. Configured in Input → OSC Input.
The same receiver also accepts Operator Messages – text cards pushed onto the Operator Screen over OSC.
Every inbound OSC address in one place: the OSC Dictionary.
Settings
- OSC server (Listen for OSC messages) – master toggle. Off, incoming OSC is ignored and the port is released.
- UDP Port – 1–65535, default
8765. Saving restarts the receiver on the new port. - Multicast group – an IPv4 multicast address (
224.0.0.0–239.255.255.255) the receiver joins, so one sender reaches every station at once. Defaults to239.20.20.20; clear it to disable. Unicast and subnet broadcast are received regardless. The interface is set under Network Interface Assignment; in Simple network mode it is the station interface. - Allowed sender IPs – comma-separated IPv4 addresses (no CIDR ranges or IPv6); blank accepts any host. Leave this empty only on bench networks. Without it, any device on the LAN can hijack marker positions.
Address scheme
Two forms are accepted, both absolute writes in PSN coordinates (X = stage left, Y = upstage, Z = up):
/marker/<id>     x  y  z       # full triple
/marker/<id>/x   v             # set X only
/marker/<id>/y   v             # set Y only
/marker/<id>/z   v             # set Z only
Within a single frame, last-write-wins per axis. Per-axis writes after a triple override only that axis; a triple after per-axis writes resets all three. Values are in metres relative to the Reference Point. Messages for markers this station does not control are ignored.
/marker/<id>/park           # park the marker
/marker/<id>/unpark         # unpark the marker
Arguments are ignored. See Parking a marker.
Example: TouchOSC
A simple TouchOSC layout with three faders (X, Y, Z) targeting marker 1 would send:
/marker/1/x   <float>
/marker/1/y   <float>
/marker/1/z   <float>
Set OpenFollow’s OSC Input port to match TouchOSC’s send port and add the iPad’s IP to the allowlist.
Example: console-driven cue presets
Hard-code positions from your lighting console’s OSC export to position markers ahead of a scene:
/marker/1   3.0  5.0  1.65
/marker/2   -2.5 4.0  1.65
Combine with the operator’s gamepad: the cue jumps the marker to a starting position; the operator takes over from there.
Example: grandMA3
Add OpenFollow as an OSC destination under Menu → In & Out → OSC (set its IP and the OSC Input port). Fire writes from a macro or cue with SendOSC, which carries the type tags and values in the message string. Group the tags, then the values – three floats in one message hit the full-triple address:
SendOSC 1 "/marker/1,fff,3.0,5.0,1.65"The per-axis form works too, one float per message:
SendOSC 1 "/marker/1/x,f,3.0"
SendOSC 1 "/marker/1/y,f,5.0"
SendOSC 1 "/marker/1/z,f,1.65"
To track a live value, embed an attribute or variable in the macro line so each execution sends the current position. Add the MA3 console’s IP to the allowlist.
Parking a marker
A parked marker holds its position. Keyboard, gamepads, and 3D mice leave it alone: they neither move nor reset it, and the controller stays connected. The 2D mouse, OSC position messages, and the Touch Remote still move it. Park state survives a restart.
Park and unpark from the P control of a View & Control row in Markers & Zones → Marker Control & Visibility (see 3D Markers → Parking), or over OSC with /marker/<id>/park and /marker/<id>/unpark. A parked marker shows a blue P on its Operator Screen card and in Controller Slots.
Combining inputs
OpenFollow doesn’t lock a marker to a single input. A typical multi-input setup:
- Operator drives marker 1 with a gamepad.
- Pre-show cues hard-position marker 1 via OSC before the operator picks up.
- Action keys (Reset, Toggle Help, Speed) on the keyboard remain live throughout – useful when the gamepad is unplugged briefly or replaced.
Last-write-wins applies per axis within a frame – an OSC message landing on the same frame as a stick deflection overwrites that axis.
Touch Remote (experimental)
A setup tool for focusing lights: stand on a known spot with a tablet or phone and drive a marker onto yourself. Don't keep it open during a show. Shown only with the Touch remote feature on (General → Station Settings → Advanced Settings → Features); Allow browsers to drive markers under Input → Touch Remote (default off) lets browsers that can open the web interface drive this station's markers. While off, the remote's button is hidden and the station refuses remote requests. The setting is never exported, imported, or sent to other stations.
Tap the round button in the bottom corner of the page to open the remote card.
- Marker chips – the markers this station controls. Tap one to give the remote that marker.
- Stick – the further you push, the faster, up to the station's Max Speed. Let go and it stops. It always steers in stage directions, whatever the Control frame; the UPSTAGE / DOWNSTAGE labels show where it drives.
- Facing FOH (turning arrows) – turns the stick around for standing on stage facing the audience. The tablet remembers it.
- Hand – moves the card to the other corner. The tablet remembers it.
- Z wheel – drag up or down; each notch moves the marker's height one step (5 cm by default).
- Reset – sends the marker to its default position.
- X Y Z – show where the marker is until you type; enter a position and tap Glide. The marker travels there at the station's Max Speed, within 10 km of the origin, in the web interface's units.
While the remote holds a marker:
- No other input moves it: gamepads, keyboard, mice, 3D mice, OSC positions, and Fully Automatic tracking are ignored for it. Speed buttons and the marker fader still work. The Operator Screen shows a caution row naming it.
- Taking a marker while person detection is on switches detection off for the whole station; the card says so. It can be switched back on under Person Detection at any time.
- Another tablet taking the same marker takes it over; the first card shows that it lost it.
- Opening the card takes no marker; tapping a chip does. Closing the card gives the marker back.
- If the tablet stops talking to the station (Wi-Fi drop, screen lock), the marker stops within a quarter of a second and the remote lets go of it after 10 seconds. Tap the chip again when the tablet is back.
1. Xbox is a trademark of the Microsoft group of companies. OpenFollow is not affiliated with or endorsed by Microsoft.
2. PlayStation is a registered trademark or trademark of Sony Interactive Entertainment Inc. OpenFollow is not affiliated with or endorsed by Sony.
3. SpaceMouse and SpaceNavigator are registered trademarks of 3Dconnexion GmbH.