
Manual / Operating
On-Screen UI
The display rendered over the live camera feed on the station's HDMI output – distinct from the web configuration UI. Read this before Following a Performer.
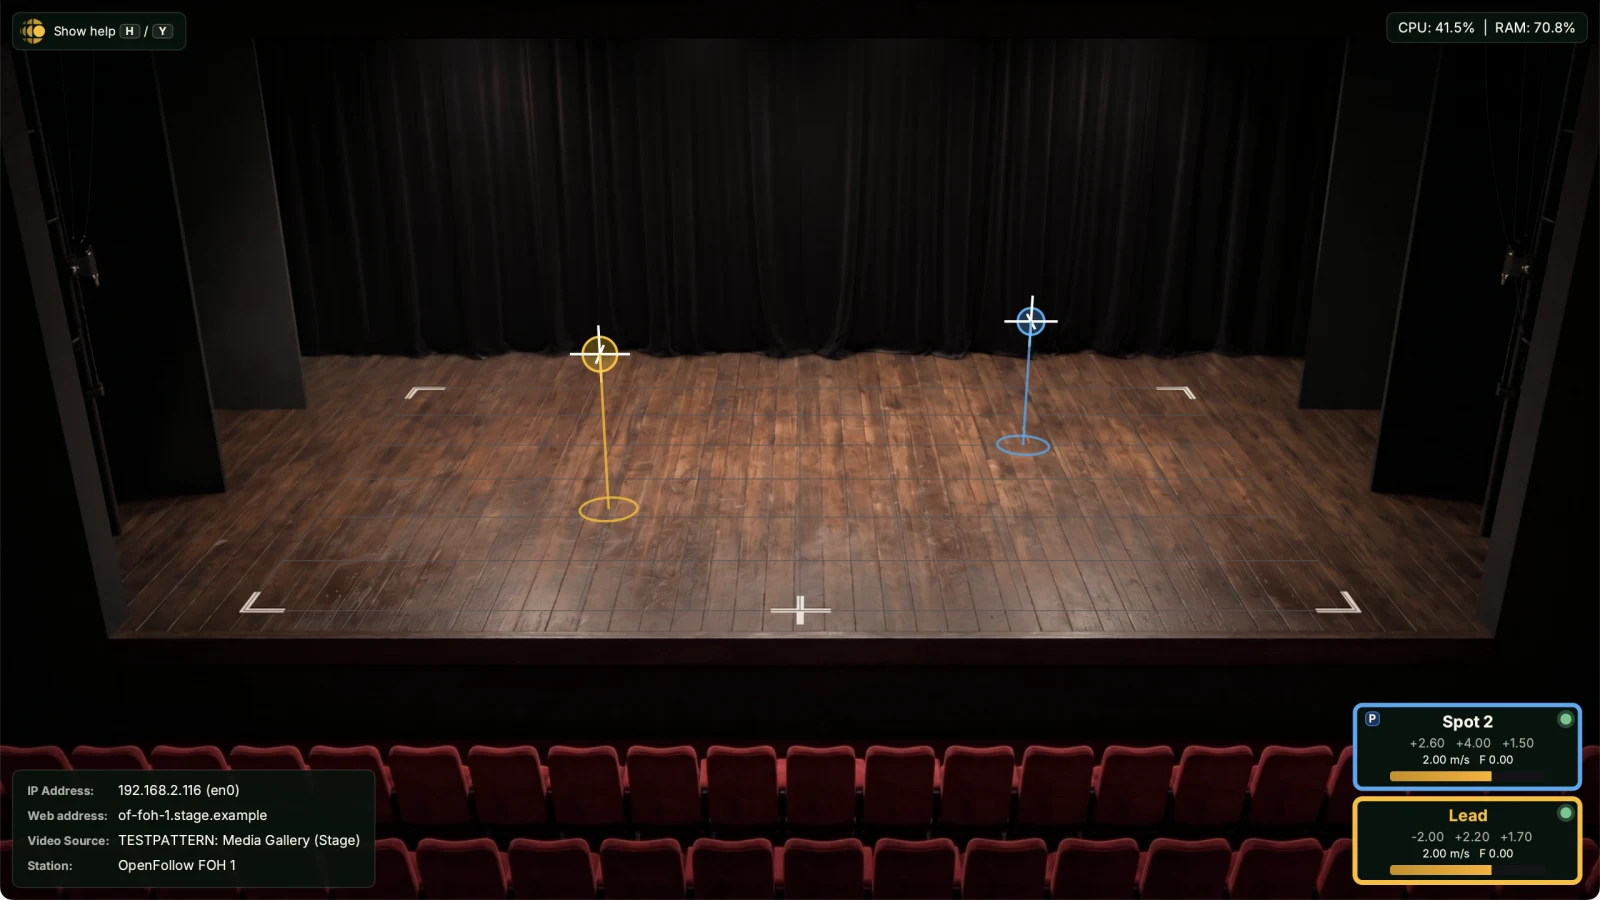
The basic layout
The live camera image fills the screen; everything else is drawn on top as semi-transparent overlays.
- Persistent – the grid, the markers, the status panels and the marker cards.
- Toggleable – the key list (help) and the zone overlay.
- Status – system stats and status rows top right, address panel bottom left, marker cards bottom right.
A console or show-control system can also push operator messages – short text cards, typically the next cue – onto the screen over OSC.
The marker
The stick moves a ground position across the stage plane in X / Y. The marker is drawn above that point at the Z set with the Z control; Z holds until changed.
Markers & Zones → Marker Visuals → Marker Style picks how it is drawn: Crosshair (default) or Cone. Appearance is set in 3D Markers → Marker visuals.
Ball
A semi-transparent sphere at the marker's 3D position: the ground position, raised by Z. Sized in metres, so it scales with perspective like a real object on stage.
Crosshair
A 2D cross pinned to the marker's screen position, the same point as the ball. The precise pointer for centring on a target.
Z Line
The line between the ground position and the ball. Longer as Z rises, absent at the stage plane.
Ground circle
A circle on the stage plane at the ground position, filled or outlined.
Cone
A ring on the stage plane at the ground position, a smaller ring at the marker's Z, and the edges joining them, in the marker's colour. The cone replaces the ball, crosshair, Z line and ground circle. The selected marker is drawn heavier; a marker this station only views is drawn dimmer.
Z display
The Z value on the marker card follows Z readout: Show Z relative to the Reference Point shows Z as sent; Show Z relative to the grid (default) subtracts the grid's Z Offset, so a marker on the stage floor reads 0.
Multiple markers
Every marker this station controls or views is drawn at once in its catalog colour (see 3D Markers → Shared catalog). The marker currently driven (the active marker) is drawn heavier and its card has a thicker border.
View-only markers render dimmer and their card omits the speed bar; speed text stays.
Switch the active marker with the Next / Prev Marker keys or buttons (see Gamepad, Keyboard & OSC). With two or more gamepads connected, D-Pad next/prev is suppressed – each pad is pinned to a single marker.
The grid
A faint rectangular grid on the stage plane, matching the rectangle defined during calibration. Switched with Show the grid on the Operator Screen in the Grid section.
- Sanity check. The grid lines should sit flush with what is on the floor. If they drift from a known reference such as a stage edge, calibration has shifted and you should recalibrate.
- Spatial cue. A glance at the grid shows where the marker is in stage coordinates.
Grid spacing is configurable. Show the origin cross (off by default) draws X / Y / Z axes at the Reference Point – useful during commissioning.
The zone overlay
Toggle with the Toggle Zone Overlay key (default Z on the keyboard; unbound on the gamepad). Every zone is drawn as a filled or outlined polygon on the stage plane, without names. With Occupied zones on, a zone containing a marker or detection is drawn brighter.
Useful while programming or rehearsing zone-driven cues. Leave it off in show.
The help overlay
Help starts closed as a Show help label in the top-left corner, with the Toggle Help key (default H on the keyboard, Y on the gamepad) beside it. Press the key to open the key list; press again to close it.
The key list shows only the devices that are connected – keyboard, controller, mouse, 3D mouse – with the current bindings. Every menu screen shows one shared key list in the same corner: confirm, back, move, and the key that closes all menus.
Settings menu
The on-device recovery surface. Opens with the Settings Menu key or button (default M on the keyboard, BACK on the gamepad), and auto-opens with a banner when the app needs attention. Pressed inside any menu screen, the same key closes all menus.
The info card at the top repeats the bottom-left panel. Below it: a red box with the banner or video failure when there is one, a notice such as Gamepad C2 is connected but drives no marker. when a controller has no marker, then the menu items, then two columns of QR codes linking to the documentation and Support OpenFollow.
Auto-open triggers
- Video never connected. At startup only: if the video source has not connected within 5 s, the menu opens with a banner naming the source and the failure. It closes itself when video connects. A drop after video has connected does not open it; the status rows show it instead.
- Station interface missing. At startup only: if the interface the station is pinned to has no address and the station has two or more other interfaces, the menu opens with a banner so you can pick one under Network Interfaces. With a single interface, the station uses it without asking.
- Failed video-source change. A source type, URL or option picked on the device that cannot be applied.
- Settings file not saved. A change made on the device that did not reach the settings file.
The bottom-left panel turns red while a banner, video failure or network error is showing, so operators spot the failure with the menu closed.
Menu items
| Item | Action |
|---|---|
| Remove Pushed Settings Warning | First row, only while a pushed-settings warning is pending. Acknowledges it on this station. |
| Network Interfaces | Opens the Network Interfaces screen. |
| Change Video Source | Opens the source-type list with all installed video plugins (NDI® 1 2 / RTSP / SRT / RTP / USB Camera / Pi Camera / Media Gallery / …). Confirming a type applies it live. If the new source needs a value, the list continues into the URL editor (stream URL, host or NDI® source name) or the field-choice picker (a choice field such as RTP's Encoding). |
| Button Detection | Wizard that learns a controller's buttons, step by step. Greyed out until a controller is connected. See Button detection wizard. |
| Open Web UI | Shows the web UI fullscreen on the HDMI output. Esc on a keyboard or B on the gamepad closes it. Needs the WebKit2 typelib – see Installation. |
| Export Diagnostics File for Support | Lists the connected USB storage devices; confirming one saves the diagnostics file to it and shows progress, then the result. Esc / B leaves the screen while the export continues; the result then appears as a status row. See Status & Diagnostics. |
| Restart | Restarts OpenFollow. |
| About | Version, licence and project links. |
Network Interfaces screen
Shows how the station can be reached and sets its IPv4 addressing. The layout follows the network mode.
Simple. One screen for the station interface:
- Open on a computer on the same network – the web address (any interface when it answers everywhere).
- Interface – the interface that carries all of this station's traffic. Automatic (<interface>) shows the one picked automatically; opening the row lists the adapters.
- IPv4 – Configure picks DHCP, DHCP with manual address or Static; then IP Address, Subnet, Router (optional), and the Lease under DHCP.
- DNS Servers – editable whenever the interface's addressing is editable.
- Actions – Apply Changes; Renew DHCP lease (DHCP methods only); Serve web UI on all interfaces and Remove FQDN when they apply.
Advanced. The first screen lists Interfaces, each with its address. Choosing one opens its own screen: Reach it at (the address others use), Adapter details, and Change this interface with Set to DHCP, Set a static address... (then IP Address, Subnet, Router (optional), Apply, Cancel) and Renew DHCP lease.
Addresses are entered on a digit grid: Up/Down (or D-Up/D-Down) changes the digit, Left/Right moves between digits. Apply validates first; on failure a banner names the problem and nothing is committed. An address starting 169.254 is shown with link-local or fallback and a red notice, because other machines may not reach the station there.
Where this build cannot change the network, the screen shows the current state and Apply Changes and Renew DHCP lease report that addressing cannot be changed from there.
Source-type picker
Lists every available video plugin. Up/Down (or D-Pad) to highlight, Enter/A to confirm, Esc/B to cancel. Confirming the active type skips the swap but still continues to the next step – the way to edit an RTSP URL or pick a different NDI® source.
If the swap fails (RTSP picked with an empty URL, for example), the previous type stays and the Settings menu opens with a banner.
URL editor
On-device text editor for the active plugin's primary URL or host. Reached from Change Video Source when the new plugin's value is empty, or after confirming the active type.
- Type on the connected keyboard – any printable character is accepted. Backspace deletes one character, Enter applies, Esc cancels.
- The text goes to the active source: the stream URL for RTSP and RTP, the host for SRT, the NDI® source name for NDI®.
- Apply takes effect live. If the source still fails, the previous type stays and the menu shows a banner.
- Cancelling restores the previous source type.
Field-choice picker
On-device dialog for option-list settings – for example RTP's Encoding (H264 / H265 / MP2T). Up/Down (or D-Pad) to highlight, Enter/A to confirm, Esc/B to cancel. Applies live.
Esc / Back semantics
Inside any sub-screen, Esc/B goes back one level (Network Interfaces sub-screens return to the interface list or the Network Interfaces screen; everything else returns to the Settings menu). On the Settings menu, Esc closes it. The Settings Menu key closes all menus from any screen.
Status indicators
- Top right – system stats.
CPU: x% | RAM: x% | xx°C; temperature appears whenever the host reports one. - Top right, below the stats – status rows. See below.
- Bottom left – address panel. Rows IP Address: (with - DHCP unavailable after a 169.254 address), Web address: (the station's
.localname or FQDN), Video Source: and Station:. Turns red while a banner, video failure or network error is showing. - Bottom left, above the panel – virtual fader cards. One per virtual fader: name left, value right (two decimals), with (not picked up) in muted text until a physical fader has caught up.
- Bottom right – marker cards. See below.
Status rows
Each row carries a level: red error, caution, info or success. Rows are sorted gravest first; the stack shows four and folds the rest into +N more, coloured by the gravest hidden row.
| Row | Meaning |
|---|---|
| Video: <state> | The video source has a fault, for example Unreachable, No video, Stalled, Interface down, Wrong interface. |
| Video 3840×2160 > Full HD, 60 fps > 30 fps | Video arrives above the supported resolution or frame rate. |
| <Output>: <interface> is down | An output has lost its interface or address and is not sending. |
| Control conflict: Marker 3 (House Left) | Another station also controls the marker. See Marker Control & Visibility. |
| C2 missing · marker 3 | The controller assigned to a controlled marker is not connected. |
| Web remote holds marker 1 | Caution while the touch remote holds a marker; other inputs to it are ignored. |
| Settings pushed from <station> | Info. Another station sent its settings here. Remove it with Remove Pushed Settings Warning. |
| Diagnostics saved to <drive> / Export failed | Result of an export started from the Settings menu. |
| Power supply under voltage / CPU throttled (too hot) | Raspberry Pi power or thermal limit reached. |
Marker cards
One card per marker this station controls or views, in the marker's catalog colour; the active marker's border is thicker.
- Status dot. Green when the marker is online. An off-white disc with a cross when it is offline.
- Name from the catalog (
M<id>when it has none), then X / Y / Z (Z per Z readout) and speed, in the station's unit system (metric or imperial). - Speed bar on controlled markers.
- C1, C2 … top left – the controller slot driving the marker. C1 missing in bold, with the card turned red, when that controller is not connected.
- P (blue) – the marker is parked. See Parking.
- Red card – a control conflict, or a missing controller.
- F 0.50 after the speed – the marker fader value, when a marker fader stick is set (see Marker fader stick).
- Identify flash – the card flashes when Identify is pressed for its controller slot (see Controller Slots).
Connected controllers with no marker appear in the Settings menu's info card.
What the screen does not show
- The web UI. Configuration stays in the browser, off the operator monitor (except through Open Web UI).
- OSC traffic / send counters. Diagnostics live in the web UI.
1. NDI® is a registered trademark of Vizrt NDI AB.
2. OpenFollow does not contain any NDI® code by itself. NDI® requires closed source NDI® Tools / NDI® SDK on the host system that need to be installed separately.