
Manual / Tracking
Zone Occupancy Detection
A zone is a polygon on the stage plane. The zone engine watches marker positions (and optionally person-detection results Experimental) and sends OSC messages on each transition of the occupant count – first entry, additional entry, partial exit, and final exit. Zones are how you do cue-style automation – “fire QLab cue 12 when anyone walks downstage centre” – without a continuous tracking stream.
Trigger zones are on in General → Station Settings → Advanced Settings → Features by default. Zone heights Experimental is a separate, optional feature in the same table.
Where it lives
- Markers & Zones → Trigger Zones – global settings.
- Markers & Zones → Zone Editor – draw and edit zone polygons, top-down or on the camera picture.
Global settings
| Field | Meaning | Default |
|---|---|---|
| Trigger zones | Master on/off for all zones (Send zone OSC events). | Off |
| Overlay | Show zones on the Operator Screen. Does not affect OSC output. | On |
| Occupied zones | Draw a zone stronger on the Operator Screen while a marker or detection is inside it. Needs Trigger zones on. | On |
| Eval Rate (FPS) | How often markers are checked against every zone: 1, 5, 10, 15, 30 or 60. Lower = lower CPU. | 10 |
| Debounce (ms) | Suppresses fast in/out flicker at the boundary. An event is sent only after the marker has been on the new side for this long. 0–60000. | 200 |
| Hysteresis | Boundary thickness. The marker must move this far past the boundary before an exit is sent. 0–10 m. | 0.05 m |
Destinations – host, port, protocol, framing – are defined once under Output → OSC Destinations and shared with OSC transmitters. Each zone picks its own on its Settings tab.
Drawing a zone
The Zone Editor shows the stage from above (upstage at the top) with the grid overlay and any current markers as dots. Coordinates are in metres relative to the Reference Point. To add a zone:
- Click + New Zone. A triangle appears in the middle of the view, already selected; in the Camera view, in the middle of the picture.
- Drag its corners into place, and click an edge to add a corner there.
- Drag its name to move the whole zone.
To edit an existing zone:
- Click a zone to select it; click outside every zone to let it go.
- Drag a labelled handle (V1, V2, …) to move a vertex.
- Click an edge of the selected zone to add a vertex there; keep the button down to drag it.
- Drag the name at the zone's centre to move the whole zone.
- Delete zone permanently removes the selected zone, after confirmation.
Occupied zones brighten and show the occupant count.
Camera view
Top-down / Camera switches to the camera picture with the zones drawn on the stage floor as the saved camera sees them. Refresh Image takes a new snapshot; a full-screen button enlarges the picture. A loupe and the stage position stay on the chosen corner while you work.
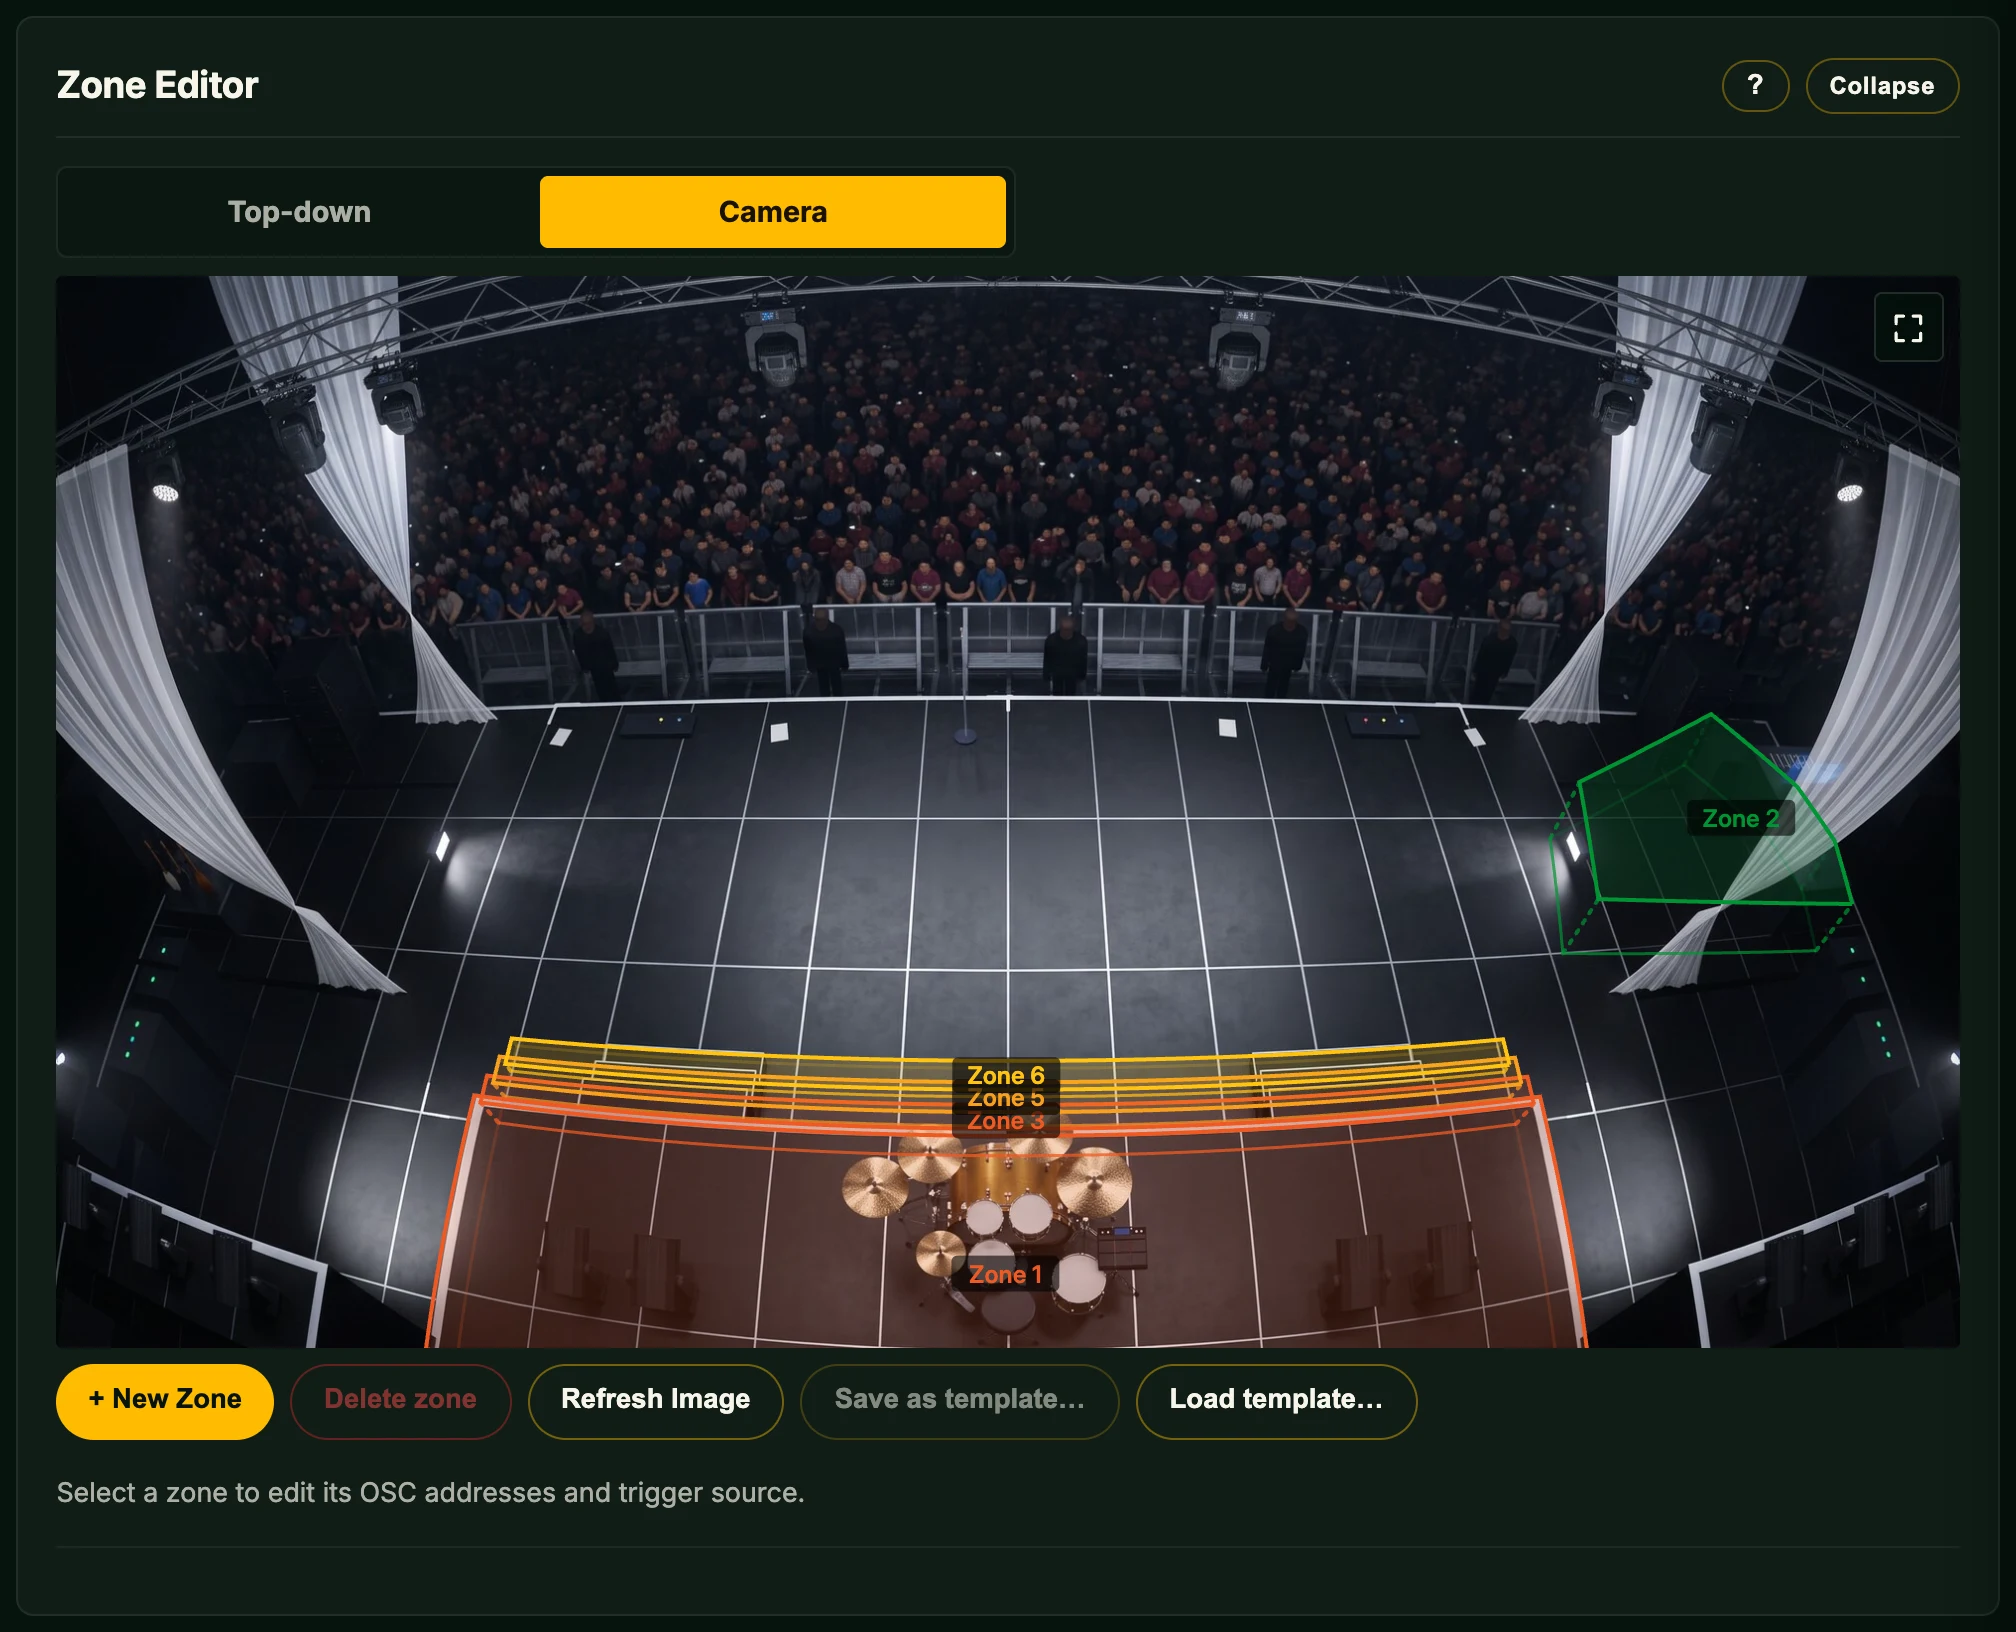
- Drag a corner (V1, V2, …) to move it; the change is saved when you let go. A press without a move only chooses the corner.
- Drag from an edge to add a corner there.
- Drag a zone's name to move the whole zone; Esc during the drag puts it back.
- A corner outside the picture has no handle; move it in the top-down view.
| Key | Action |
|---|---|
| Tab | Next corner |
| ← → ↑ ↓ | Move the chosen corner 1 px; hold Shift for 10 px |
| Delete | Remove the chosen corner |
| Esc | Let go of the corner; again to leave full screen |
Per-zone configuration
With a zone selected, the details panel has four tabs (the same pattern as OSC Transmitters):
| Tab | Contents |
|---|---|
| Basic | Name, Color, Use this zone, Trigger Source, Triggered By, and with Zone heights on, the height fields (see below). |
| Area | One row per vertex (V1, V2, …) with X and Y fields for typing exact positions, and a × button to remove a vertex. |
| Settings | The zone's OSC Destination and the four OSC messages: First Entry Address, Additional Entry Address, Partial Exit Address, Final Exit Address, each with its own address and arguments. |
| Diagnostics | Live state (occupants and last event) and Test send. |
Actions: Save Zone applies Basic, Area and Settings changes to the live engine at once. Duplicate copies a zone with its shape and settings, so you can edit the differences instead of redrawing.
Untick Use this zone to disable a zone: it sends nothing and is not drawn.
Trigger source
- Markers (PSN) – any tracked marker entering the polygon triggers events. Default.
- Detection (AI) Experimental – person-detection bounding boxes drive events (requires Person detection enabled).
- Both Experimental – either source triggers.
Triggered By – per-marker filter
The Triggered By field restricts which markers count for occupancy. It is a comma-separated list of marker IDs; blank means any marker. It is ignored when the trigger source is Detection (AI).
- Blank – every marker counts (default).
1– only marker 1 counts.1, 2, 5– only markers 1, 2, and 5 count.
Address & arguments
Each address field takes a full OSC message: the address path first, then arguments separated by spaces; quotes group multi-word arguments. A blank field skips that event. Argument types follow the literal – integers stay integers, floats stay floats, anything else is a string. See OSC Transmitters → Address vs arguments for the full rules.
OSC Destination
Pick the zone's destination from the OSC Destination list, which is filled from OSC Destinations. A zone set to (none – zone will not send) sends nothing.
The four event types
Events are transition-only – each one is sent once when the occupant count changes across its threshold. Nothing repeats at the eval rate; if you want a continuous stream while a zone is occupied, use a Stream-triggered OSC Transmitters transmitter gated on the marker's position.
| Event | Sent when | Typical use |
|---|---|---|
| First entry | Empty zone becomes occupied (0 → 1 occupant). | Trigger a cue, raise an audio bus. |
| Additional entry | Already-occupied zone gains another occupant (n → n+1 where n ≥ 1). | Increment a counter, layer an effect. |
| Partial exit | An occupant leaves but the zone stays occupied (n+1 → n where n ≥ 1). | Decrement a counter, peel back a layer. |
| Final exit | The last occupant leaves (1 → 0). | Restore default state, kill an effect. |
Typical example (fire QLab cue):
destination: QLab
address:     /cue/12/start
args:        (none)
Typical example (notify a media server when someone is downstage centre):
destination: Media Server XYZ
address:     /downstage/occupied
args:        1
Diagnostics tab
- Live state – Occupants (count and IDs) and Last event (the last address sent).
- Test send – First Entry, Additional Entry, Partial Exit and Final Exit each send their address immediately, regardless of the zone's actual occupancy. Pending edits are saved first.
Zone heights Experimental
With Zone heights on in Features, the Basic tab shows three more fields:
- Z offset – the zone's height above the stage floor. The Operator Screen and the Camera view draw the zone at that height, and its corners are dragged on that plane. A raised zone also shows its outline on the floor and a dotted line up each corner, fainter where the zone hides them from the camera. Entry and exit depend on X and Y only.
- Marker height – tick Add the Z offset inside this zone and a marker this station controls is sent and drawn with the Z offset added to its Z while it is inside. Its own Z stays as set. Where such zones overlap, the highest counts.
- Height transition time (s) – how long the added height takes to change at the zone's edge. The zone entered sets it, otherwise the zone left. 0 changes it at once.
Person-detection-driven zones Experimental
Instead of a marker, a zone can listen to bounding boxes from Person detection. Set the zone's Trigger Source to Detection (AI) or Both. This lets you trigger zone events without an operator driving a marker – useful for unstaffed setups. Accuracy and model defaults are subject to change; don't rely on it for show-critical paths.
Person detection is opt-in: enable Person detection in Features, download a model (see Installing Person Detection) and set Tracking to a mode other than Off. See Person Detection.
Detection is more compute-heavy than marker-driven zones. See Hardware.
Hysteresis & debounce, in practice
If your zones flicker (rapid in/out events as a performer skirts the boundary), increase one or both:
- Hysteresis adds a “moat” around each boundary – the marker has to cross fully past the moat before an exit is sent.
- Debounce suppresses any state change shorter than the window.
Raise Hysteresis first; debounce is the safety net.
Saving and reusing zone setups
The Zone Editor’s Save as template… stores the whole zones configuration – every polygon plus its settings – as a reusable template, and Load template… replaces the current zones from a saved one (you confirm before it overwrites). Use it to keep per-show or per-venue zone presets. In the template chooser, Export downloads a single .oftemplate file you can copy to another station, and Import… loads one in.